Using the Lookup Command for Threat Hunting (Lookup Before You Go-Go)

A wise person once said that you should use the lookup command before you go threat hunting. Or, as I hear it in my head, “Look it up before you go-go…hunting”, a la WHAM!:
In this must-read tutorial for hunting in Splunk, we’re looking at the lookup command, including what it does and how and where to use it for threat hunting. Let’s get started!
(This article is part of our Threat Hunting with Splunk series. We’ve updated it recently to maximize your value.)
What does the lookup command do?
Often overlooked in the heat of the moment, lookups allow you to add csv files to Splunk and then use the lookup command to run searches that match data in Splunk to the contents within that csv*. You can also use lookups to add context to your existing data in Splunk.
For example, if you wanted to have additional context about a user in Splunk, you could import her office number or location as a lookup, and then use the lookup command to show that in Splunk.
*Of course, lookups don’t always have to be csv files — they can be automatic lookups, they can be scripted, they can pull data from databases, and they can leverage Splunk’s KV store.
Using the lookup command to hunt for threats
Lookup commands can do all sorts of things, as shown in our technical documentation. However, for this article, we’re looking at using the lookup command particularly for hunting.
Let’s walk through some things and places you may want to hunt in your environment. We’ll look at:
- Public DNS servers
- IP addresses
- Windows Event IDs
Public DNS servers
Maybe you know that adversaries in your network often use public DNS servers. Perhaps you create a hypothesis that "Malicious actors and adversaries can be detected in our network by their use of public DNS servers.”
Now, how would you find these public DNS servers in your network?
A good place to start would be to get a list of public DNS servers and find hosts in your network that connect to these servers. Let’s walk through this together.
To get started, let’s find a list of open/public DNS servers and download (or create) a csv:
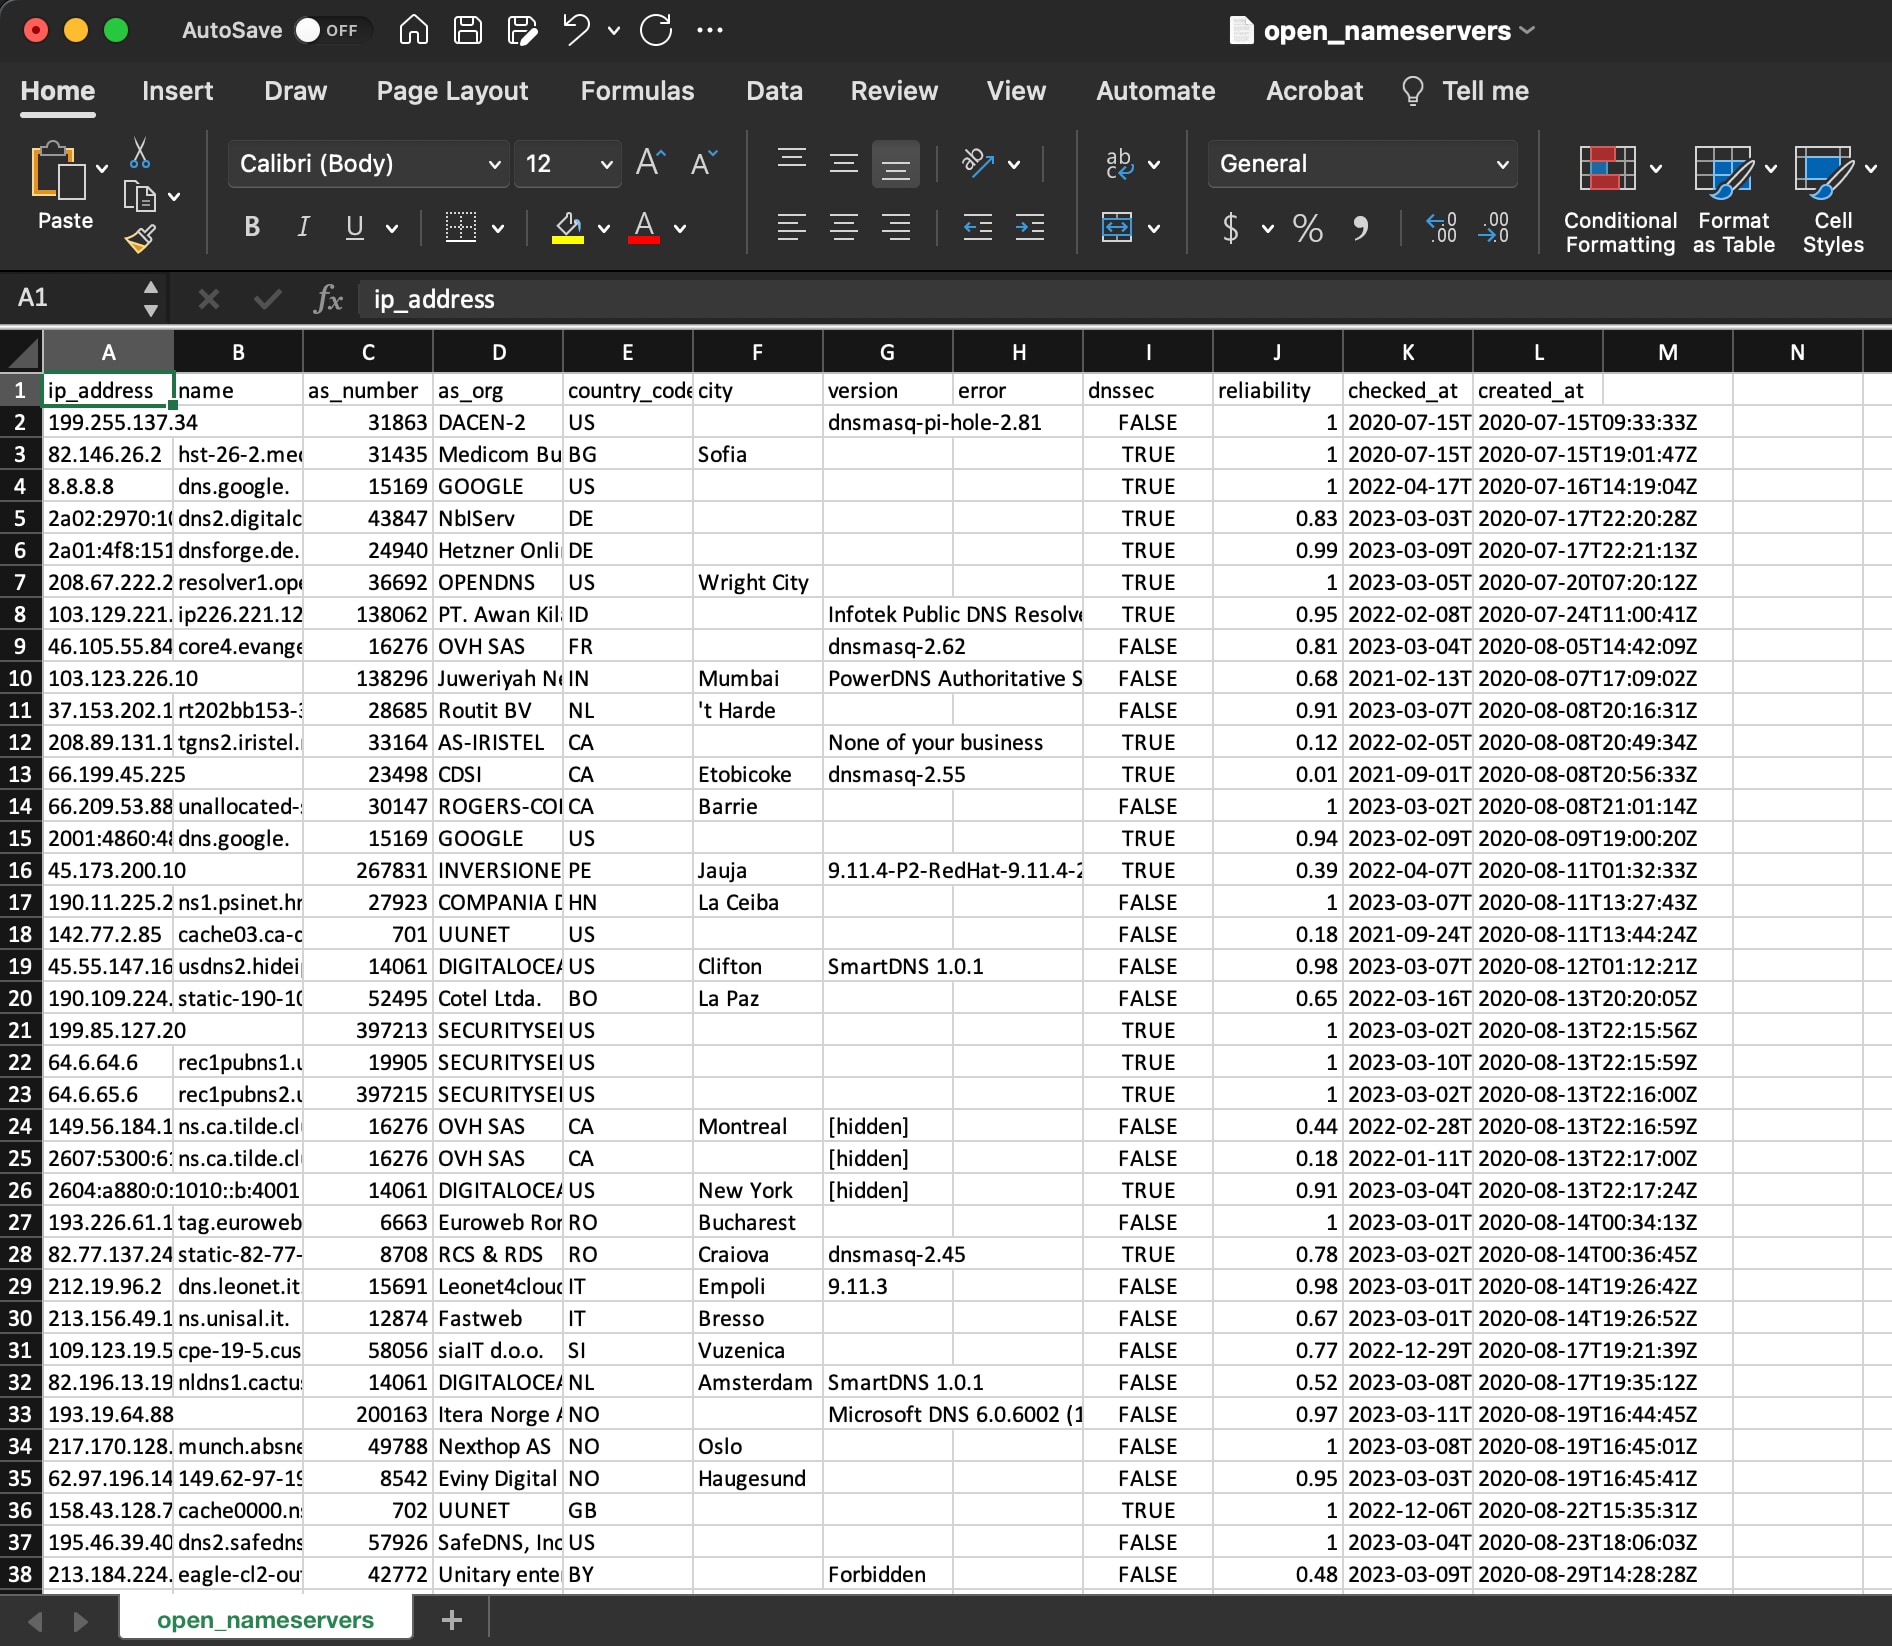
Now that we have a csv, log in to Splunk, go to "Settings" > "Lookups" and click the “Add new” link for “Lookup table files”. You will see this window:
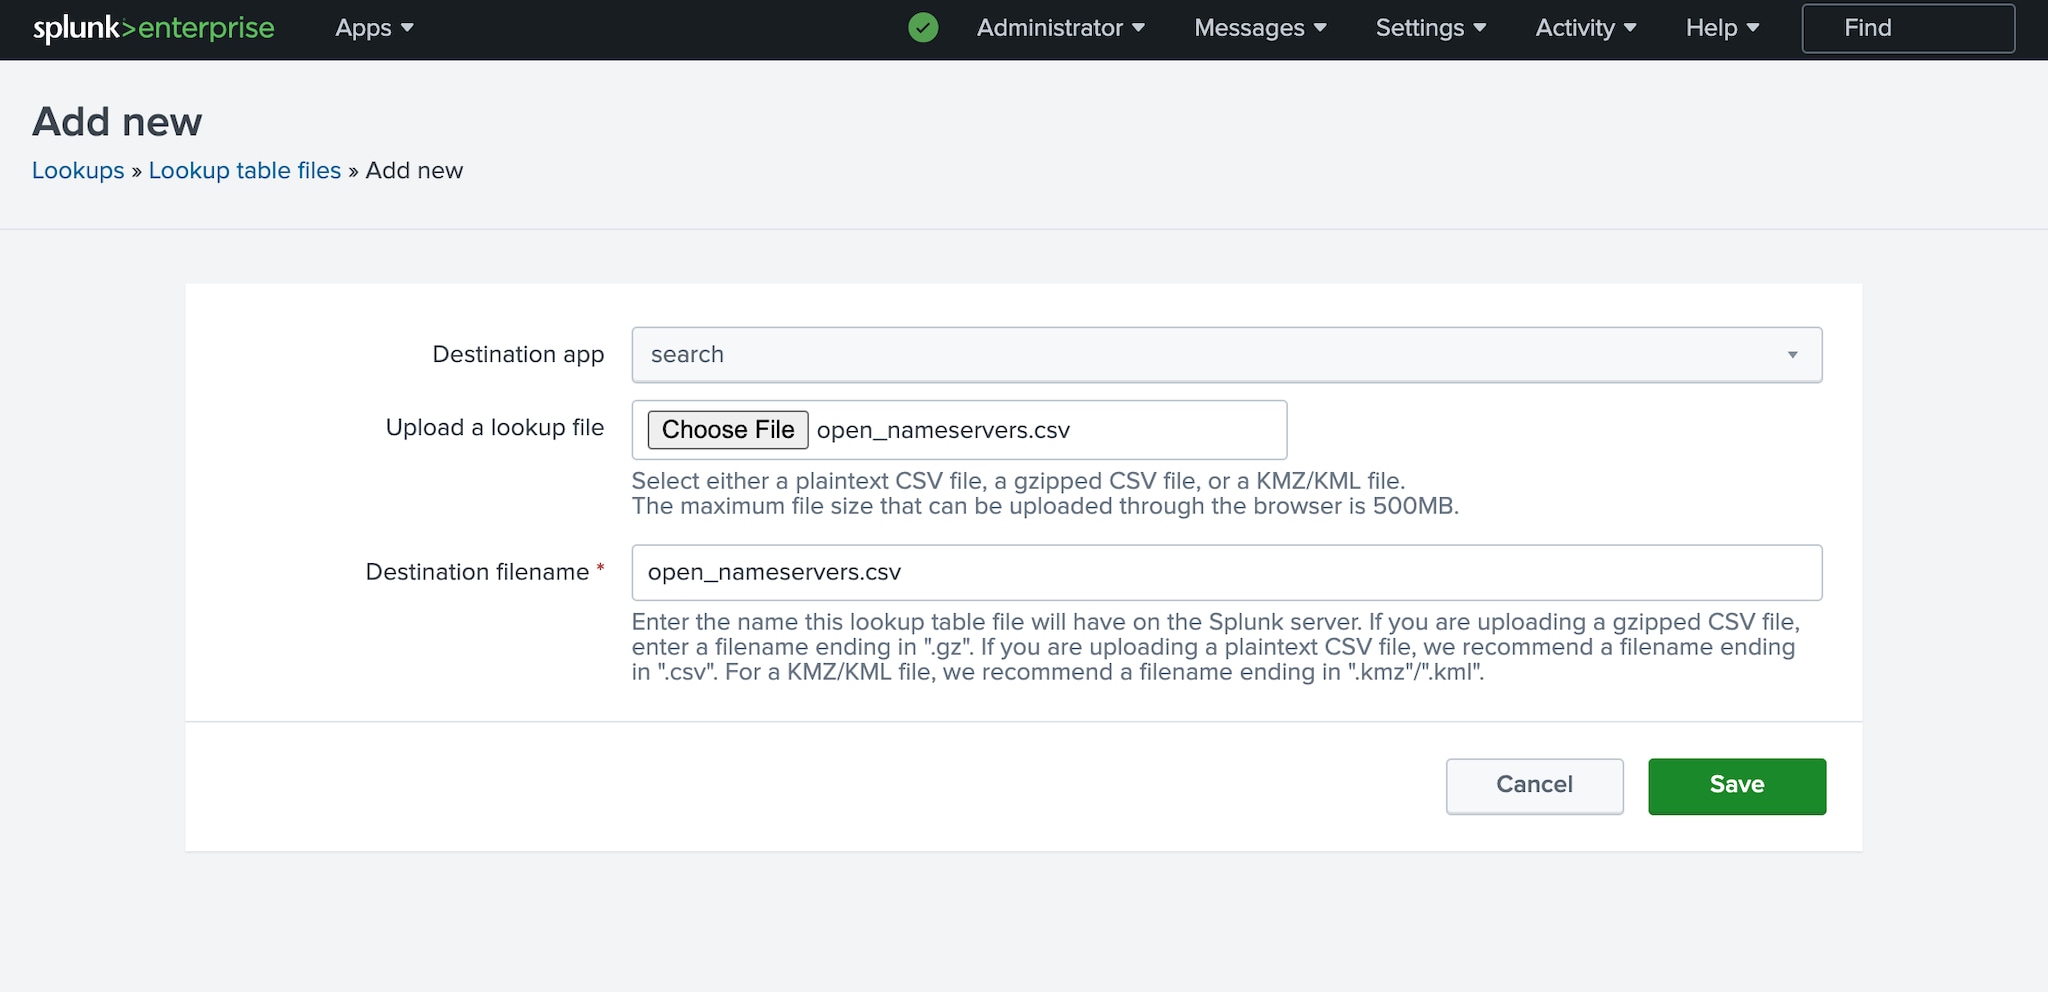
Click “Choose File” to upload your csv and assign a “Destination Filename”. In this case we kept it simple and called it “open_nameservers.csv”.
Click "Save."
Splunk returns you to the “Lookup table files” menu. Return to “Lookups” and click “Add New” in the “Lookup definitions” to create a linkage between Splunk and the csv we just uploaded.
In the example below, we used the (very imaginative) name “open_nameservers” for our definition name. This definition name will be used with the lookup command.
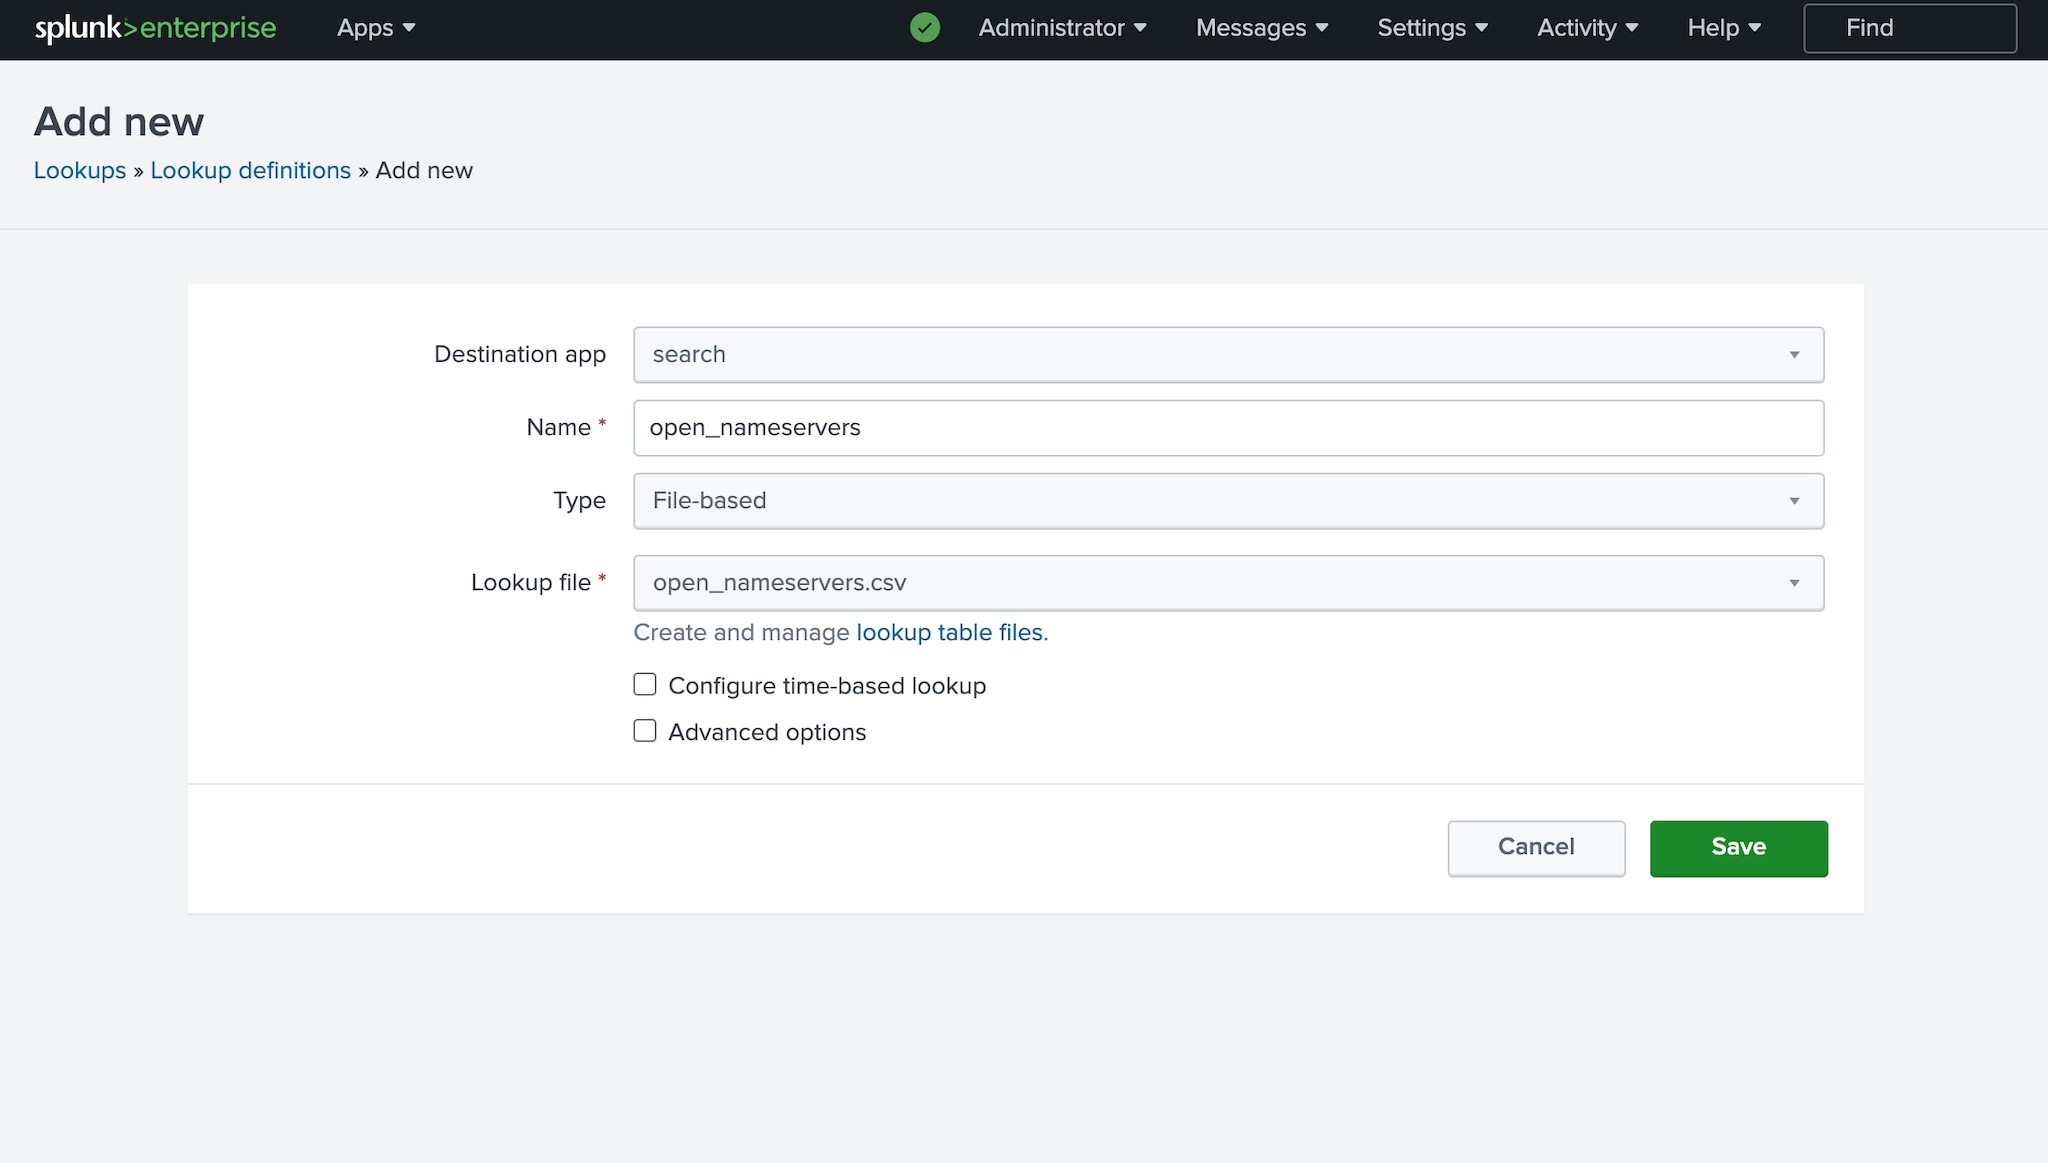
Now that we have our csv loaded and defined within Splunk, we can search for matches (e.g., any servers that responded to DNS servers that are in the lookup table).
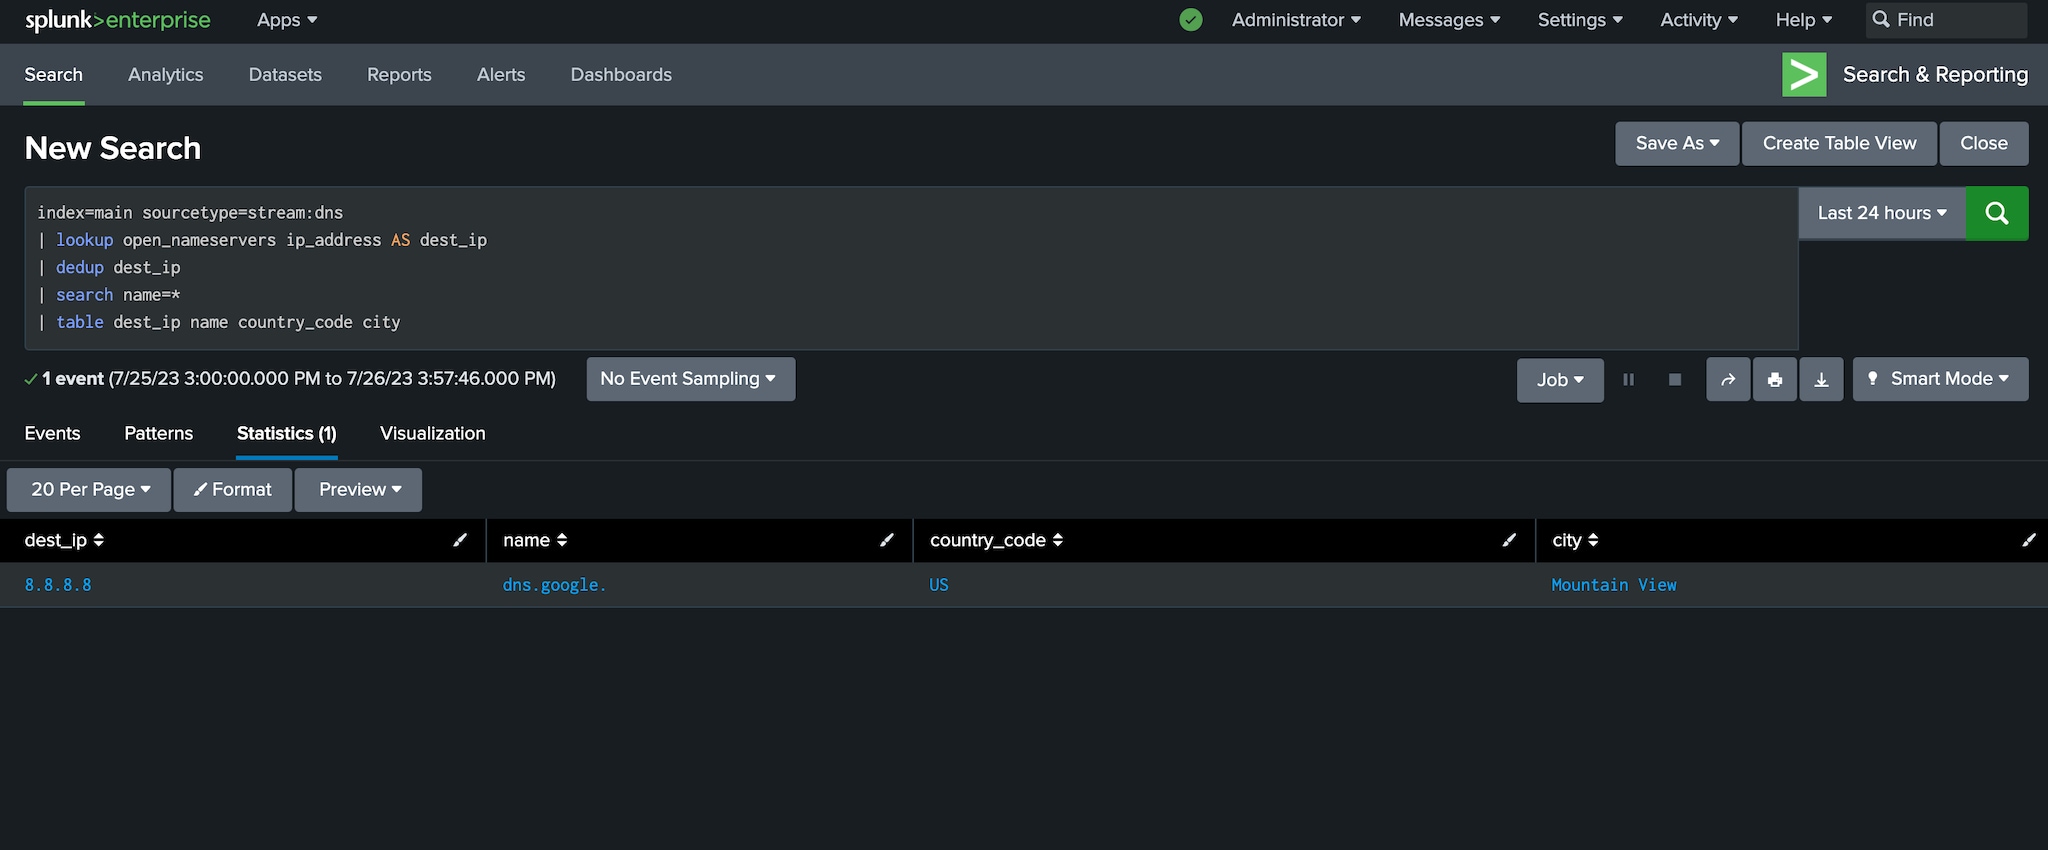
Depending on the kind of data you have, your sourcetype may differ. In this example, we are leveraging Splunk Stream and gathering DNS data. The command
| lookup open_nameservers ip_address AS dest_ip
takes the field “ip_address” from the open_nameservers.csv that we defined and looks for matches in your data set in the field “dest_ip.” Whenever there is a match, Splunk adds additional context from the csv to the event.
We immediately see that a workstation in the network is connecting to 8.8.8[.]8 (a free public DNS server offered by Google) to resolve DNS domains. When the ip_address field in the csv and the dest_ip in the log matched, three fields were added to the event because all three fields are in the open_nameservers.csv:
- name
- country_code
- City
(Read more about hunting in DNS with Splunk.)
IP addresses
Using this enrichment technique, we could then add another search command (ironically called “search”) to find all IP addresses that have a lookup match based on any of these new fields. In the example above, we searched the name field for any matches. If I was focused on looking for Google DNS servers, I could add:
| search name=*.google.com
If we wanted to search for any IP addresses that were NOT public domain servers, we would simply swap = for !=
| search name!=*
This would display events from IP addresses that did not have a matching value in the field ‘name’ from the lookup file.
Windows Event IDs
In the example above, we looked for IP addresses. However, this technique is not limited to IP addresses. This is also helpful for Windows Event IDs that may indicate advanced adversary activity. You could search Event IDs using OR statements, butmore scalable solution would be to put those Event IDs into a lookup table.
In this example, we create a csv with three fields:
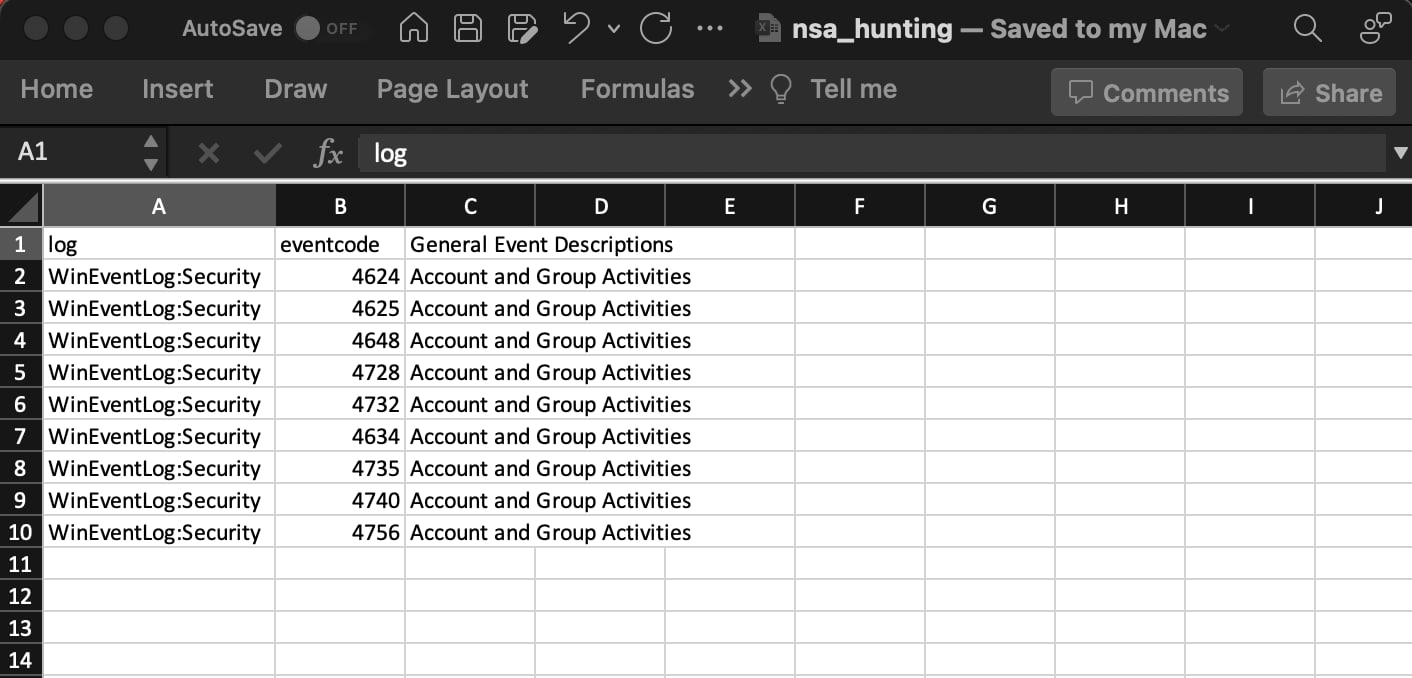
As in the earlier example, we go to "Settings" > "Lookups" and click the “Add new” link for “Lookup Table Files.” The file is uploaded and assigned a name. The lookup definition is created and matched with the csv that was just imported.
In the example below, the lookup definition and csv are called nsa_hunting. The eventcode field in nsa_hunting is matched to the field “EventCode” in the Windows event logs. This displays all of the event codes in sourcetype=WinEventLog:Security that match the NSA guidance for detecting Account and Group Activities by the adversary.
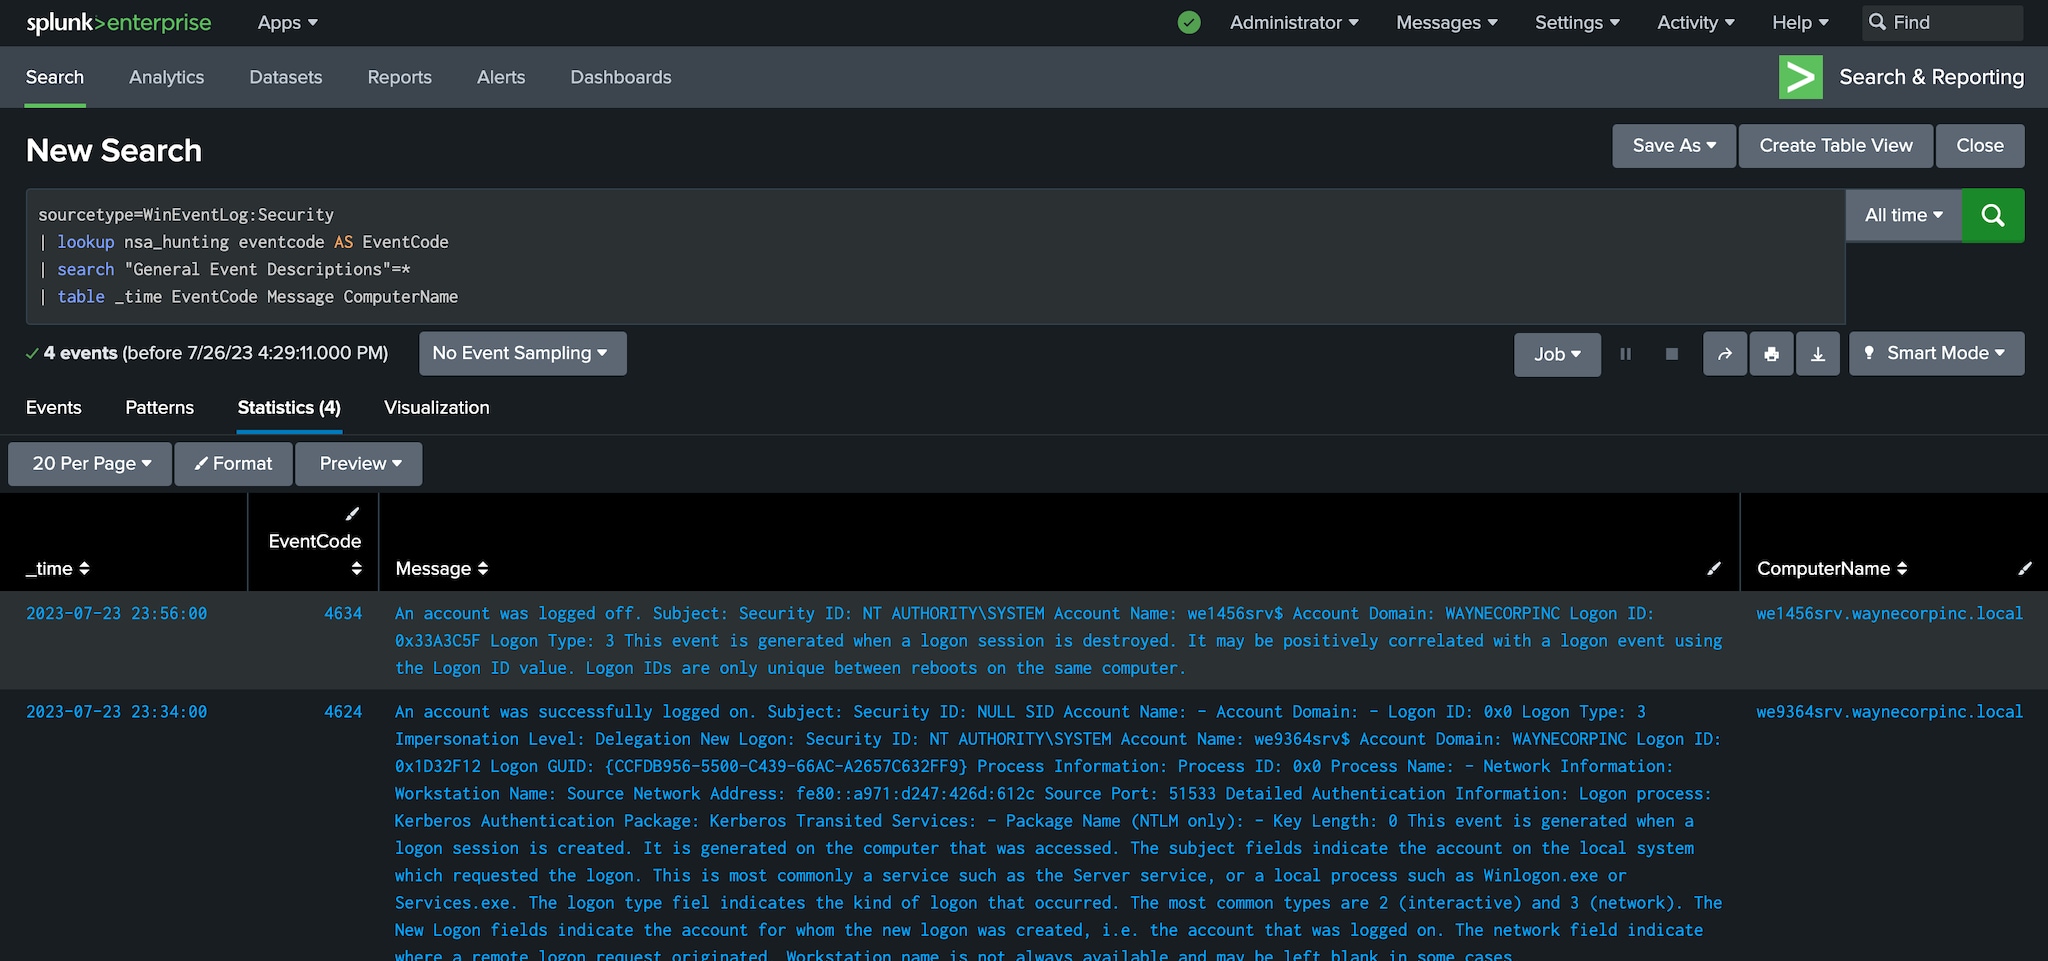
(For more on event code IDs, check out our comprehensive piece on hunting in Sysmon data.)
Best practices for the lookup command
Lookup tables are a very powerful tool to match indicators of compromise (IOCs) and strings. However, there are a few things to keep in mind:
- To add entries to your csv that contain wildcards (i.e. *maliciousioc.com), you will need to edit the transforms.conf. You cannot do this via the GUI.
- Make sure you create your csv correctly. Sometimes, Excel may not create a file correctly and Splunk can’t ingest it correctly. If Splunk fails to ingest, look for special characters hidden in the .csv.
- I find it very useful to always have a second field in my lookup. This second field is something that you can search for to verify that Splunk is finding your match. If it doesn’t exist, you never had any matches.
- Keep your lookups updated! Lookups can be kept up to date in a few ways. two popular methods are to upload a new .csv to the Splunk search head, another is to use the “outputlookup” SPL command to take the events from a Splunk search and add those to a lookup. These kinds of searches can be scheduled so that you always have a fresh lookup.
With that, I leave you with thoughts of IOCs from Mandiant reports dancing in your head. Happy Hunting. :-)
Related Articles
About Splunk
The world’s leading organizations rely on Splunk, a Cisco company, to continuously strengthen digital resilience with our unified security and observability platform, powered by industry-leading AI.
Our customers trust Splunk’s award-winning security and observability solutions to secure and improve the reliability of their complex digital environments, at any scale.


