From Chaos to Clarity: Managing Metrics at Scale in Splunk Observability Cloud
Observability Mike SimonBefore joining Splunk, I had the opportunity to lead observability operations for several Fortune 500 companies. During that time, we shifted from traditional monitoring vendors of the time to more agile, best-of-breed, often niche observability solutions. This shift gave our teams flexibility to move fast and instrument what mattered, via self-service.
One of those tools (not to be named) became our core metrics engine. Self-service adoption took off. Developers and SREs had visibility like never before.
But then the telemetry sprawl hit!
Our metric volume exploded. Cardinality was through the roof. And worse, we had no insight into which metrics were actually useful. When we asked for help, the vendor’s response was an “opportunity” to renew our annual contract early. We knew we had a problem, but we had no way to clearly identify it — let alone fix it — without risking critical coverage.
That’s exactly the kind of problem Splunk Observability Cloud’s Metrics Management capabilities are built to solve.
What and Why: Metrics Management in Splunk Observability Cloud
In modern observability, more data isn’t always better. As SRE, DevOps, and platform teams adopt self-service instrumentation, metric volume tends to grow unchecked. Add in the growing complexity of today’s IT environments — distributed architectures, ephemeral infrastructure, and multi-cloud sprawl — and it’s easy for telemetry to become overwhelming.
The result? Noise, confusion, and surprise overages that are tough to trace back to specific sources.Most organizations struggle to answer basic questions like:
- What metrics are we collecting?
- Who’s sending them?
- Are they still being used in alerts or dashboards?
- Can we clean them up without breaking something?
Splunk Observability Cloud’s Metrics Management capabilities helps you answer these questions and take back control. And the best part? You can do it all centrally, without editing collector configs or backend systems.
With Metrics Management, you can:
- See which metrics are driving time series volume across your deployment
- Understand how those metrics are used, who owns them, and where they show up
- Act through a simple point-and-click interface to drop, archive, or aggregate metrics with confidence
Overview: Metrics Management at a Glance
In this article we’ll double-click into each of the capabilities with a quick overview and some practical guidance on how you might leverage it.
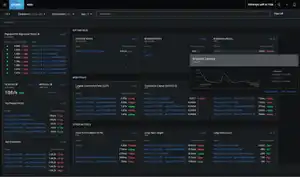
See the Invisible with Usage Analytics

The Usage Analytics view shows:
- Trends in average Metric Time Series (MTS) over time. Allowing you to visually identify spikes and or trends of your metric volume
- Top metrics by usage volume.
- A searchable table that includes utilization status, utility score, billing class, and % of total usage.
This is your source of truth for what’s being ingested, used, or just wasting space.
Here is a detailed overview of the fields in the table
Pro Tips:
- Filter by “Unused” then sort by “percentage over total” to find metrics that are generating volume but aren’t used in any dashboards or alerts.
- Sort by utility score to identify metrics that are high-value vs. low-impact.
- Filter “Billing Class=custom” to wrangle in your Custom Metrics
- Export the table and share with platform owners to start a telemetry review cycle.
Understand: Get the Full Picture with Metric Profile View

Clicking into a metric, within the “Usage Analytics” dashboard, opens the Metric Profile, where you’ll find:
- Dimensions contributing to the metric time series count (great for spotting high-cardinality fields).
- Tokens sending the metric. Token identification is helpful for identifying ownership.
- Charts & Detectors that depend on the metric.
The Metric Profile view allows you to better understand what is contributing to the MTS count (often dimensions) and where the metric is being leveraged in your deployment. This allows you to make data driven optimizations, such as leveraging Metrics Pipeline management to archive, aggregate, and/or drop metrics.
Here is a detailed overview of the fields in the table
Pro Tips:
- Target noisy dimensions like
container_id,host, or other “id” dimensions as they can be prime for aggregation. - Leverage Token Insights to trace metrics back to environments, apps, or teams. Ideally you are assigning tokens to specific applications, users, and/or use cases; This allows you to engage the right teams and/or disable tokens, to eliminate unnecessary metric sprawl (if needed)
- Check Dashboards/Alerts before changing anything, to avoid breaking critical monitors or visualizations.
Again, this is the context you need to make confident, data-driven decisions about what to optimize or keep.
Act: Reduce Waste Without Breaking Things with Metrics Pipeline Management

Once you know what needs cleanup, Metrics Pipeline Management (MPM) gives you the tools to do it easily. Quickly start by clicking the blue “Create Rule” button from the metric profile page.
With MPM’s point-and-click interface, you can:
- Ingest and keep metrics in real time (default) These metrics remain available for use in charts and detectors.
- Send data to archived metrics Archived metrics are not available in charts or detectors, but you can restore them for up to 31 days or reroute specific subsets back to real-time when needed.
- Drop your metrics entirely Dropped metrics are not stored or available for monitoring, but aggregated MTS derived from them can still be retained.
- Aggregate metrics to reduce high-cardinality volume Use aggregation rules to group and roll up MTS by meaningful dimensions (like
regionorservice), dropping noisy ones (likecontainer_id). This dramatically reduces MTS volume while preserving insight.
In the screenshot, a simple rule reduces raw MTS by 66% just by removing an overly verbose dimension.
Value add: Aggregate metrics to reduce high-cardinality volume
Dramatically reduce MTS volume while preserving insight. In MPM, use aggregation rules to group and roll up MTS by meaningful dimensions — like region or service — and drop noisy dimensions, such as container_id. Keep the insight, quiet the noise.
Pro Tips:
- Start with unused metrics Optimization in this area is typically low risk and high reward.
- Archive before you drop – metrics are restorable for up to 8 days.
- Use routing exception rules to keep critical MTS in real-time while cleaning up the rest, for metrics with high cardinality
- Preview and validate impact/outcomes within the UI before saving to validate reductions.
- Use aggregation to keep what matters: Start by identifying which dimensions actually provide value (e.g.,
region,endpoint,service) and aggregate away noisy or high-cardinality ones likecontainer_idorhost. You’ll retain meaningful insights while dramatically reducing your MTS footprint.
This is where savings happen. MPM gives you the ability to optimize metrics on your terms, with full visibility and control.
Wrapping Things Up
Metric sprawl can sneak up on even the most mature teams, especially when SREs, DevOps, and platform teams fully embrace self-service. What starts as healthy adoption can quickly turn into a tangle of unused data, rising bills, and unclear ownership.
And with the ongoing explosion of tools, services, and telemetry sources across increasingly complex environments, there’s only more data coming. The challenge isn’t just about scale, it’s about (re)gaining control before things .
Splunk’s Metrics Management gives you the tools to fight back. These capabilities provide visibility into what’s being collected, clarity on what matters, and a simple interface to take action when things get out of hand or when opportunities for optimization arise.
Ready to Get Started? To determine your current metrics utilization, understand how/if they are being used, and centrally optimize them via pipeline management, follow these simple steps!
- Go to Settings > Metrics Management in Splunk Observability Cloud
- Use Usage Analytics to identify unused or high-volume metrics
- Drill into any metric, then use Pipeline Management to drop, archive, or aggregate with confidence
Need additional help? Check out the official docs or connect with your Splunk account team. We're happy to guide you through it.
Buried in Metrics Sprawl and Struggling with Overages?
If you're facing growing costs, unclear metric usage, and no easy way to optimize, you're not alone. Start your 14-day free trial of Splunk Observability Cloud today and experience how easy it is to take back control of your metrics.
Splunk offers modern observability solutions
Looking for a platform that delivers these must-have features? Splunk Observability Cloud is a leading modern observability platform that supports end-to-end visibility and enables self-service observability across the enterprise.
- • Learn more about Splunk Observability Cloud
- • Try Observability Cloud for free
- • Explore technical docs for observability and the developer portal
Check out this Splunk Tech Talk that shows these concepts in action:
| Video |
|---|
| https://www.youtube.com/embed/Ewdkp2lYhzA?si=FiCy9_e_NtHKujB1 |
Related Articles
Announcing the General Availability of Splunk Real User Monitoring (RUM)
How Microsoft Used Splunk’s Ethlogger to Turn Blockchain Data Into Supply Chain Insight
